Editing a narrat game
There are two types of content to edit to make a narrat game:
- Dialogue scripts:
.narratfiles that contain the branching narrative of the game - Config files:
.yamlfiles that contain config data about the game
Example narrat game
Here's an example narrat game with the following .narrat script:
Opening the narrat project and getting ready to edit files
A narrat game is just a folder with files in it. To start editing your game, open that folder in your text editor (VS Code).
- Open VS Code
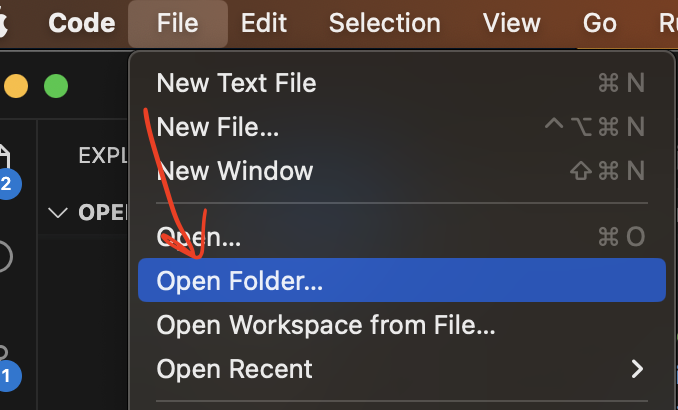
- In "File" menu, click "Open Folder"
- Choose the folder of the narrat game you created
- Now you can browse the files.
- A lot of the files may not be relevant to you and you don't need to worry about them outside of advanced usage.
- Most of the files you're interested in will be in the
public/datafolders (where assets and config are), and thesrc/scriptsfolder (where code and narrat scripts are)

TIP
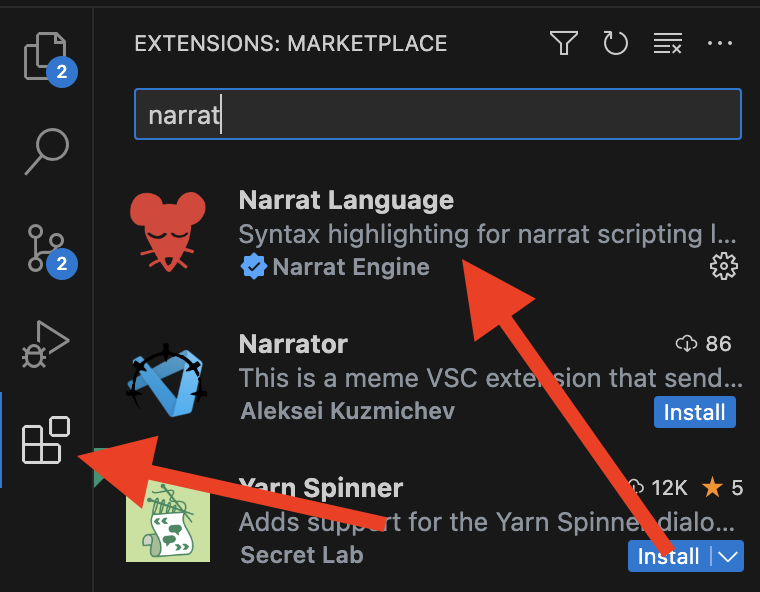
Install the Narrat Language Visual Studio Code extension to get pretty syntax highlighting when editing narrat scripts.
VS Code should prompt you to install it when you open a narrat game. If not, click on the Extensions button on the left, then type "Narrat" in the search bar and install the extension.

What's in a narrat game?
The following sections will explain what folders and files are important to know about to edit your narrat game.
public folder
The assets (image, music etc) and config files are inside the public folder from the root of the game. This public folder is a folder for static assets which will be added to the final build.
Any image, config file, or other asset that the game needs to load outside of code will be in this folder.
TIP
Assets in the public folder can be referred via their path from that folder. For example in css, to use an image that is in public/img/button-background.png, you would use /img/button-background.png.
src folder
The src folder is where scripts live. There are TypeScript files to setup the engine (which you won't normally need to edit), and more importantly in the script subfolder are the .narrat script files that make up your game.
INFO
For advanced uses, it is also possible to change code itself or integrate plugins, which also would be in the src folder.
Narrat scripts
Narrat scripts are the main way a game is created. They contain the flow of the game and lines of dialogue. The narrat scripting language is specifically made for narrat.
In the src/scripts folder of the game, there is a game.narrat file (or named differently depending on which template you used). This is where the actual game dialogue is written. The example dialogue there shows how to use a few basic features, so you can easily start writing your own dialogue. Just above is a link to the example narrat script page to find more examples as needed.
Importing scripts
All the narrat scripts used in a game are imported and listed in src/scripts.ts. If you want to add or remove narrat scripts from your game, import them at the top of that file and remember to add or remove them from the list of scripts exported at the end of the file.
TIP
You can make your entire game in a single script file if you want, but it's useful for organisation to separate it into multiple files. Just remember to import them like below
Example scripts.ts:
import demo from './scripts/demo.narrat';
import quest from './scripts/quest.narrat';

export default [demo, quest];Narrat scripts are in a custom language nade for narrat, see the language syntax guide page for more info.
TIP
We advise using Visual Studio Code for editing narrat scripts. There is a Narrat Language VS Code extension which will give you great syntax highlighting.
See the language syntax guide to learn more about how to edit narrat scripts.
Example scripts
There are a number of example narrat scripts available. Reading through their .narrat script files can be a good support for finding out how to do various things.
Config files
There are various config files in narrat games which allow to extensively customise how the engine behaves.
By default, games ship with a default config so you don't need to do anything. As you start using more features, you will need to edit the config as needed.
config.yaml
The config file contains basic info about the game. In it are defined images, screens, buttons, musics, skill checks, items, quests and more.
More info about the config files in the Config Files guide
characters.yaml
The characters.yaml file contains the config for all characters that can speak in the game. They should all at least have a name value, and an idle sprite. The sprite is used for displaying character portraits during dialogue, and the value should be a file path relative to the imagesPath value defined in the config part of this file
The color character names appears as can be changed with the color value in the style property of the character (the value can be any valid CSS color).
See more details at characters and portraits
Other config files
There are individual config files for most narrat features which you can edit. The best way to learn about them is to look at example games and see how they are used.
What's next?
To make your game, open your .narrat script files and start writing your game!
TIP
You can look at the sidebar on the left of this documentation website to find various guides and pages about narrat features and how to use them.
There are other things you might want to learn about, so here are some ideas:
Language Syntax Guide
Learn the narrat scripting syntax to write your game.
All commands reference cheatsheet
This page contains a cheatsheet table of all the commands available for use in narrat scripts.
Viewport
Learn about the viewport to add visual backgrounds and interactive buttons to the viewport of your game
UI Theming and customisation guide
Learn how to theme your game visually with CSS
Building and releasing your game
Learn how to make a build of your game to release it
Skills System
Learn how to use the skills system
Inventory system
Learn how to use the inventory system
Updating Narrat
It's important to know how to update narrat to get the frequently released new features and bug fixes.